Understanding shutter speed

Shutter speed, together with aperture and ISO, is one of the fundamental camera controls that can greatly affect the appearance of a photo. So what does it mean? The shutter in most cameras is a physical device that prevents light from reaching the cameras sensor. There are a couple of different types of shutter with varying characteristics but the type most commonly found in modern digital cameras is the focal plane shutter. When a photograph is taken this shutter opens for an amount of time according to the camera settings (the shutter speed), and the cameras sensor or film records light passing through the lens.

Measuring shutter speed

Shutter speed (how long the shutter stays open) is measured in fractions of a second at normal speeds, and modern cameras only display the fraction. For example a shutter speed of 1/100th of a second is displayed as 100 on the cameras screen. Very low shutter speeds are usually displayed as seconds in the format X” with the quotation mark denoting whole seconds as opposed to fractions. For example a shutter speed of 2 seconds appears as 2″ and a shutter speed of 2  1/3rd of a second displays as 2″3. Check your own camera manual for the exact display format though.

In most situations you will want to keep the shutter speed to be as high as possible, to minimise any motion blur effects (with the exception of deliberate, creative use of motion blur. Motion blur occurs when you take a photo and the camera or the subject of the photo, or both, are moving. If the shutter speed is too low and there is movement while the image is being recorded, the camera will capture this movement – resulting in an image of the same thing in two different paces. Anyone who has tried to take a photo in low light without a flash will be familiar with how this can look. Motion blur isn’t always obvious, but can subtly affect the sharpness of a photo. Some degree of motion blur is unavoidable in most shooting conditions but we can reduce it to the point that it is not visible to the naked eye.

The ugly face of motion blur.

Choosing the right shutter speed

An important point to remember about shutter speed is that the minimum acceptable speed is dictated by the focal length of the lens you are using. A telephoto lens with longer focal length magnifies the image more, which also magnifies and motion blur effects. In contrast a wide angle lens will not show motion blur to the same extent, because movement will be smaller in comparison to the total image area. This fact leads to the well known “1/focal length” guideline for calculating shutter speed. This guide tells us that the minimum acceptable shutter speed with a handheld camera should  be the focal length of the lens in question as a fraction of a second – so, a 100mm lens should use a shutter speed of at least 1/100th of a second and a 20mm lens should use 1/20th. This is complicated slightly by the crop factor of digital cameras which changes the effective focal length of a lens. Taking this into account a 100mm lens on a digital camera with a standard crop factor of 1.5 gives an effective focal length of 150mm, so the minimum shutter speed then becomes 150mm.

This is only a guide of course, but is a good way to get your shutter speed in the ballpark. If you can hold your camera as steady as a rock you might be able to get away with much less – and if you are a jittery coffee-holic even 2 times the focal length might not be enough! In extreme low light conditions we will sometimes need to ignore this guideline though, and just hope the result is good enough to use.

Creative use of shutter speed

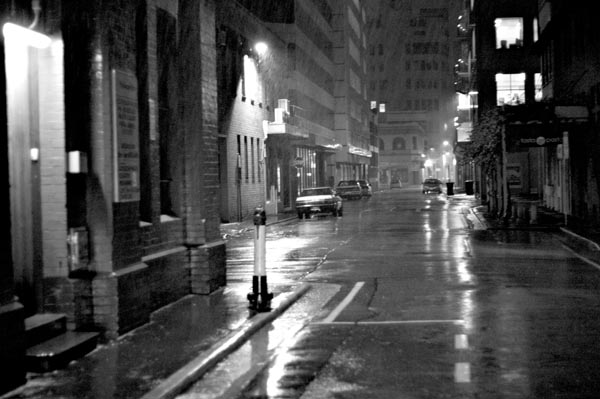
One of the creative ways you can use shutter speed is to deliberately create extreme motion blur. A great example of this is those night time shots with car headlights creating trails of light. These are achieved by using a very long shutter speed of tens of seconds or even minutes, with the camera mounted steadily on a tripod to eliminate any camera shake. Another technique that relies on a long shutter speed is panning, where the camera tracks a moving object with the shutter open for longer than usual. If the photographer has a steady hand, the camera will stay pointed directly at the same point on the moving subject, creating a sharp image, while the background will be reduced to blurred lines. A common example of this is seen in photos of racing cars, with the blurred background creating the impression of speed and motion.

This photo shows the trailing light effect caused by moving car headlights. Settings were 30 seconds at f20, ISO100.

You can try an experiment to see the effects of a low shutter speed for yourself. You will need a decent tripod, and a location where a moving object is in view – could be cars, a waterfall, or even people walking past.

Set up your camera on a tripod, and set the ISO to its lowest setting, usually 50 or 100. If you are shooting in daylight you will want to use a small aperture, so set it to the maximum allowed by your lens. If shooting at dusk or night, try with the aperture at a medium setting like f8 to start off. Our goal here is to reduce the amount of light passing through the lens as well as reducing the sensors ability to record that light. This will compensate for the larger amount of light which will be recorded by the camera due to the long shutter speed. Now, set the slowest shutter speed that won’t overexpose the image – if this is hard to judge try 10 seconds and adjust until you find the longest you can use without overexposing. If shooting at night, you might be able to keep the sensor open for many minutes!

When you have your moving subjects in sight, take a photo. Once the photo is complete, you will be able to see any movement as smoothly blurred trails through the image. Use of this effect is limited only by your imagination, and when shooting in mixed, moving lighting you can achieve some unique effects.

What is ISO?

Together with shutter speed and aperture, ISO is one of the fundamental controls that you can use to balance the exposure of an image.  Unlike the other controls though, ISO does not change the qualities of the light that passes through the lens and is recorded by the sensor. Instead, increasing the ISO increases the sensitivity of the sensor with the result that less light is needed to record an image.  This flexibility means that rather than having to compromise between the perfect aperture and shutter speed to expose an image, both can be set as desired and the ISO then adjusted to give the perfect exposure (within limits).

For example, let’s say we are shooting a wedding in a dim room. We are using a lens with a 70mm focal length and in this situation we want to use an aperture of f5.6 to make sure a group shot is in reasonably sharp focus from front to back. We set the aperture, and also set a shutter speed of 1/70th of a second to avoid any motion blur. Checking the exposure meter, we find that the picture is underexposed by 2 stops! We don’t want to use a larger aperture or slower shutter speed, so the best option is to increase ISO. Increasing the ISO from 100 (the most common default setting) to 400 (the ISO rating doubles for each stop) should now give us the desired exposure.

Increasing ISO isn’t without a price though – at higher ISO settings visual ‘noise’ or grain becomes obvious in a picture. Unlike other camera settings, this effect of ISO varies significantly between camera brands and models. Some cameras produce subtle or at least natural looking noise at higher ISOs, while others can produce garish and objectionable grain that makes an image hard to use for much at all. As a rule of thumb though, ISO 100-400 will produce low-moderate amounts of noise, 800 is an upper-medium setting, and 1600 and above will produce very obvious noise in the image. Sensors in modern digital SLRs are increasingly good at keeping high ISO noise under control but it is useful to test all settings in the ISO range and evaluate the images to find what is acceptable for your own tastes.

This example shows high ISO noise typical of the Canon 5D at ISO 3200. Note that this image is near 100% zoom on screen, but in a print the grain would be less visible

ISO noise can be categorised into two main types – chrominance and luminance. Of the two, chrominance noise is more likely to impact image quality noticeably as it causes coloured blotches to appear in the image. Luminance noise makes the image grainier as well, but this can be used to create atmospheric effects for particular images.

In this example, the high ISO setting allowed me to capture the image, but also adds to the seedy feeling of the back alley

One way to deal with the effects of noise is to convert the image to black and white, simulating the look of an old black and white film shot. This can be an effective way to salvage a shot that was otherwise too noisy to use! Anotehr option is to use noise reduction software, either specialised software such as Noise Ninja (a popular Photoshop plugin) or the settings in your cameras supplied software. Reducing noise via software can result in a less sharp image though, so it is preferable to shoot with the lowest ISO setting possible most of the time.

Fujifilm 3D Camera Review

I recently had the chance to borrow an interesting toy, the Fujifilm Finepix Real 3D W1 point and shoot camera. A unique camera, this moderately sized camera has twin lenses and sensors that take pictures at the same time, from slightly different angles. When these images are shown in such a way that one image is viewed by each eye, the resulting picture looks three dimensional. Impressively, the resulting images and movies can be viewed in 3D on the rear 2.8 inch screen (as can a live preview before taking the shot). Although the viewing angle is fairly narrow, no special glasses or equipment are needed and the effect is certainly attention grabbing. Everyone who looked at this camera couldn’t look away! Be careful though, as looking at the LCD for too long produced noticeable eye strain for some users, lasting for up to an hour.

3D effect

The 3D images are certainly effective, being reminiscent of those stereoscopic viewers popular in the 80s. Best results are had shooting objects in the middle distance, with the camera having trouble aligning both lenses properly on anything closer than a few meters. The parallax (how the left and right images are aligned) can be adjusted in camera before or after shooting if the camera didn’t line things up just how you like, but this can result in a heavily cropped image.

Images

The W1 captures 10mp images, or movies in 640×480, on its twin 1/2.3″ CCD sensors. Images are saved simultaneously in .JPG format as well as Fujis proprietary .MPO format (Multi Picture Object). This file contains both of the JPG images, and can be viewed by Fuji’s dedicated picture frame… and not much else! Fortunately there is an application available here that will allow users to extract the JPG files separately or convert to the more widely used .JPS format. Of course you can shoot straight 2D images with the W1 but let’s face it – you aren’t going to buy one of these to take 2D shots. A big downer was the tendency for glare to cut down on contrast significantly. This isn’t helped by the ease of smearing a greasy finger over the lens. Some kind of lens shade, although difficult, would have helped – as is, you will need to avoid situations where the sun is shining on the lenses.

Let’s take a look at some example images (in 2D only, unfortunately).

Some JPG compression is obvious at 100%, even at fine quality

The in-camera black & white isn't unpleasant, although better results can be had from your own post processing. Note the lack of contrast caused by glare.
ISO 1600

Navigation

For a point and shoot camera the interface wasn’t too bad. Camera options are accessed with a pres of the F button, and menus can then be navigated and activated with the directional pad. A range of shooting modes are available with aperture priority and full manual among the more useful of the mostly automatic options. ISO can be set up to 1600 but don’t plan on using these images for too much without serious noise reduction. You can set standard, chrome, or black and white modes with chrome producing more saturated images and BW 3D images being an awkward but interesting blend of old and new technology.

Build

Weighing a little over 300g, you will struggle to fit this comfortably in a pocket. Remember though that you are effectively getting two cameras in one, so the size and weight is understandable! Build quality is very polished, with rounded corners and a front slide that is manually opened to expose the lenses and activate the camera. The only real gripe is that the lenses are quite close to the outer corners of the camera, so it is very easy to cover one up with a finger – this is exacerbated by the difficulty in spotting the stray finger if it only covers one of the images.

Final thoughts

Once you get past the novelty of this camera and its rear 3D screen, the limitations of this system become obvious. Despite several display options (dedicated 3d TV or monitor, 3d ‘Shutter’ glasses, 3d red/blue glasses) the images you produce just aren’t going to be easy to show off to anyone. Of course, the takeup of 3D TV in the coming years could change all that, with all the major manufacturers bringing models to market. If you do have the ability to view images (or if you just love unusual toys) this camera is definitely worth a look.

Studio Lighting Kits

Studio lighting usually refers to lights designed especially for photography. These lights are used in conjunction various light “modifiers” (so called because they all modify the quality of the light in different ways. These lights are designed to be mounted on booms or stands, and are able to allow attachments to be easily mounted.

If you are looking to buy a studio lighting kit, there are a few common packages around. For home or semi-pro use, a basic kit will either come with one light or two, with light stands for each, and should include reflectors for each light, an umbrella and a softbox at minimum. These modifiers are broadly useful and will allow you to shoot almost anything.

Modifiers

Reflectors are simply a short metal cone shape, that clip or screw onto the business end of the strobe. They produce a fairly hard, directional light with a sharp shadow.

I shot this with a white umbrella on an Elinchrome D-Lite 4 Strobe

Umbrellas soften the light considerably compared to a bare bulb or reflector. The wide area of the umbrella reflects light back from the bulb, helping to fill in shadows cast by the main light on an object. Photographic umbrellas come in white or silver to give further choice in light quality, with silver producing a slightly ‘sparkly’ or specular look compared to the more even fill of a white backing. Some umbrellas also come with a backing that can be removed so that the umbrella can be reversed and mounted in front of the light, producing a more diffuse light similar to a softbox. Lowel.com have a good comparison of the effects of an umbrella used in different ways.

A softbox is a collapsible structure with reflective interior, and an opaque covering. These produce the softest light of all the modifiers because they effectively increase the size of the area emitting light, allowing the light to wrap further around the subject of the photograph.

Another consideration is whether to shell out extra for a portable light. Battery packs are available that let strobes be used on location, and the flexibility of these can allow for real creativity.

Studio lights can be divided into two main categories – strobe, or continuous.

Studio strobes work like over-sized on-camera flash units, firing a very brief burst of light when you take a picture. Unlike smaller flash units, these usually have a “modeling light” which is always on, and gives a preview of how the light will look when the strobe fires. Good quality units will have modeling lights that vary in strength in proportion to the strength of the actual flash burst. Strobes are most useful for shooting moving things, like people. The strength of a strobe is measured in watt seconds, with a wide range available. Although it is tempting to go for the strongest you can afford, in reality it is better not to go overboard unless you have a particular purpose in mind that will require a LOT of power. The problem with a studio strobe that is too powerful is that sometimes you will want to work with a larger aperture to achieve a particular effect. Although you can adjust the power of the strobe, on a large unit even the lowest power will be too high to allow shooting at a very wide aperture (this is because of the upper limit of shutter speed that can be used when shooting flash, called the flash-sync speed).

Continuous lights are always on, as the name suggests. These are often halogen bulbs, designed to produce lots of light all the time instead of in a burst. The drawback to this type of light is that they can produce a lot of heat (in fact they are also called hotlights by some photographers), and also be expensive to run for long periods compared to the burst of a strobe. However for product shots where all movement can be controlled, these can be very useful giving a true preview of the effect of the light in advance and taking the guesswork out of moving your lights around and changing modifiers. These lights can also be much cheaper than strobes, and a basic continuous studio lighting kit of hot lights, stands and an umbrella or two isn’t a bad way to learn about lighting on a budget.

Studio lighting can be difficult to master, but immensely useful – and learning is more than half the fun!