Using a Single Lens Reflex (SLR) camera, whether film or digital, can be daunting for a photographer who is used to the simpler world of point and shoot cameras. It’s important to remember that while an SLR has all of the features of a point and shoot and more, you can strip away many of the bells and whistles and only really need to learn a few basic controls that will affect your image the most.
Aperture, together with ISO and shutter speed, is one of the ‘big 3’ settings that you will need to learn to control when using a digital SLR. Understanding aperture is possibly the single most important thing to accomplish, as the aperture setting not only controls exposure – it is also the only setting that alters your depth of field, which has a dramatic effect on how much and which parts of your image are in focus.
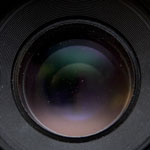
So, what does aperture mean? Put simply, the aperture is the hole in your lens that allows light to pass through the lens, into your camera, and be recorded as an image on your sensor or film. When we talk about changing aperture, we are talking about changing the size of the hole. The size of the aperture is measured in stops, or f-stops. When learning about digital photography, many photographers are confused by the fact that a smaller number means a larger aperture, or hole in the lens. For example f2 indicates a much larger opening in the lens than f16.
The example above might be a little complex to remember at first, but as long as you keep in mind that a smaller/lower f number means a larger aperture, you will know enough be able to use aperture correctly in the field.
A good way to see this in action with is as follows.
- Mount a lens, and look directly into the lens.
- Locate and press the ‘depth of field preview’ button, which is usually located near where the lens mounts to the camera.
- Change the aperture setting of your camera, and you should see the aperture diaphragm open and close. Notice how the larger the number, the smaller the hole in the lens.
When you take a photo, the camera first sets this diaphragm to the correct size, then opens and closes the shutter to allow light to pass through the aperture. Aperture is key to controlling exposure for this reason – if you are into low light photography for example, a wider aperture will let in more light allowing a faster shutter speed which in turn reduces motion blur.
Aperture range
The maximum aperture of a lens is often indicated on the lens casing in the format 1:x, where x is the maximum f stop. For example a lens with a maximum aperture of f4 would read 1:4.
Although a lens is often referred to by its focal length and maximum aperture, all modern lenses have a range of aperture settings. The range of stops that you can alter depends entirely on the lens, and most consumer lenses on the market today will have a range of around f4 to f22. More expensive or specialty lenses often have a larger maximum aperture, with many prime (fixed focal length) lenses being capable of f2.8, f1.8 or even f1.4. The reason that wider apertures generally have a higher price tag attached is that the lens must be physically larger and may have more components and better quality glass than a lens with smaller maximum aperture. However there are some cheap examples of wide aperture lenses, with most manufacturers offering a 50mm f1.8 lens for a few hundred dollars.
Experimenting with aperture
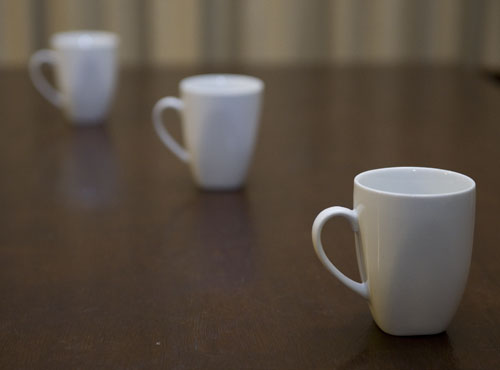
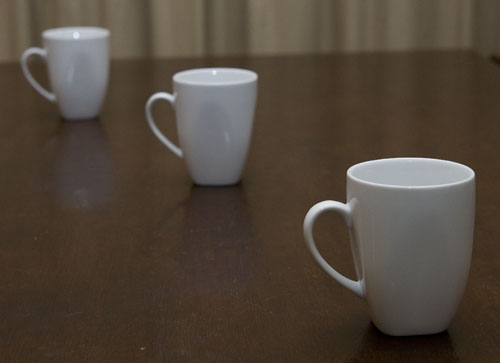
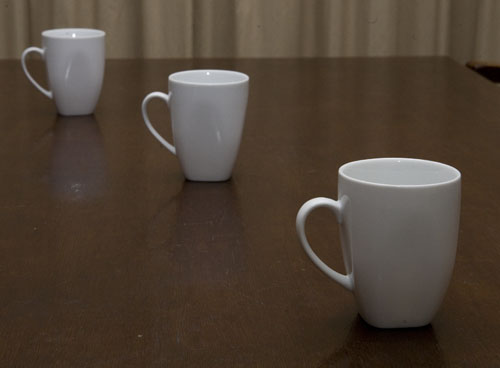
You can learn a lot about the effects of aperture with a simple experiment. Place three objects on a table, one each at the front, middle, and back. Position your camera so all three objects are in view, and focus on the first object. Now take a picture at the largest aperture your lens can manage, then at a medium aperture like f8, then at the smallest aperture setting possible.
You should notice that the larger the aperture, the more of the image is in focus! This effect is called depth of field and is key to controlling how much of your images is in focus. Using a large aperture will mean that although the point you focus on will be in sharp focus, areas in front and behind that point will quickly fall out of focus, appearing blurred. A small aperture will result in a picture where a large area on either side of your focal point is in sharp focus. You may see the areas of an image that are out of focus referred to as bokeh, and the quality of the bokeh of different lenses is a subject of debate and opinion among many photographers. You can use this effect to your advantage in many ways – for a large scene like a landscape it might be best to use a small aperture to ensure the whole scene is in focus. If you are shooting a portrait or close up of an object you might prefer a large aperture to throw the background out of focus and draw attention to your subject! Once you understand depth of field and how to control it you can achieve many impressive and creative effects in your images, totally changing the look and feel.


Thank you. I just got a Lumix zs10 and, while I love to take snap shots, had no idea what apertures were, you helped imensely.